Description

POLYREZ MAXX FLOW 250 HP 100% SOLIDS EPOXY
Maxx Flow 250 HP is a long pot life, 100% solids, high-performance, industrial epoxy, perfect for all types of residential, commercial and industrial concrete floors. Compared to other epoxies Maxx Flow is much more user friendly, with very low odor and much longer working time. Maxx Flow 250 HP Epoxy is a thick, high-build coating that can be applied by squeegee, roller or a combination of both.
Maxx Flow 250 HP Epoxy is more than just a high-performance concrete sealer, it is also a complete flooring system. In addition to being a great high-build coating for all types of concrete floors, the Polyrez Epoxy system also features 20 awesome metallic colors and 14 solid colors. This makes Maxx Flow 250 HP Epoxy one of the most versatile products we have ever offered.
Each part of the Polyrez Epoxy System is sold separately. This gives you the unique ability to create the exact floor you want, while only purchasing the components you need, in the amounts you need. This gives you complete flexibility over your project, unlike garage floor or concrete epoxy "kits".
Maxx Flow 250 HP Epoxy is perfect for all types of high-performance floors:


Essentials
- Extremely Durable
- High-Build "Wet Look"
- Perect for Metallic Floors
- 100% Solids Epoxy
- High-Gloss Finish
- Extra-Slow Cure Time
- Squeegee / Roller Application
- Recoat Window 12-24 hrs @72 F
- Coverage - See Detailed Info
![]() Warning: This product can expose you to chemicals including Epichlorohydrin, which is known to the State of California to cause cancer, and Epichlorohydrin, which is known to the State of California to cause birth defects or other reproductive harm. For more information go to www.P65Warnings.ca.gov.
Warning: This product can expose you to chemicals including Epichlorohydrin, which is known to the State of California to cause cancer, and Epichlorohydrin, which is known to the State of California to cause birth defects or other reproductive harm. For more information go to www.P65Warnings.ca.gov.
Detailed Info!
To learn more, keep reading or click a link below to jump to a specific topic:
- Detailed Description
- Cleaning and Preparation Instructions
- Mixing
- Specific Applications
- Maintenance
- FAQ's
250 HP Maxx Flow Epoxy
Cheap? ... No.
Awesome? ... Yes!
High-build epoxy is especially suited for commercial, industrial and metallic applications. This is where Maxx Flow really excels over other epoxies. In most cases these floors have had previous damage, repair or the concrete itself just plain sucks thanks to the "lowest bidder" who installed it. The extended pot life and enhanced flow characteristics of Maxx Flow make installation much easier on these large, imperfect surfaces... Especially for metallic epoxy applications where multiple colors are being "marbled" together.
High-solids products like 250 HP Epoxy are actually very easy to apply. Unlike paints and cheap low-solids sealers, these products don't need to be excessively rolled. Apply in a heavy, wet, even coat and let the product self-level. Under application or over-rolling can cause unwanted texture in the final appearance. With 100% solids products, extra care should be taken to ensure proper surface preparation before installation. If possible shot-blast or diamond grind to 25-50 grit. This type of coating is designed to be installed thick and needs maximum adhesion.
Maxx Flow Epoxy can be used clear, with color or with our Metallic FX pigments. Each part of the 250 HP Epoxy System is sold separately to maximize versatility.
 EpoPack Epoxy Color:
Color can be added to Maxx Flow Epoxy to create beautiful, high gloss solid colors. EpoPack Color is available in 14 great colors to fit any situation. Colors can also be mixed to create endless combinations. Color (usually black) is also recommended in the base coat of metallic floor installations for optimum color effects. Each 16 oz. can is designed to tint a 3 gallon kit to a solid opaque color (5.3 oz / gallon). If desired, simply add less pigment to achieve a more translucent color.
 Metallic FX Pigments:
Metallics are available in 20 great reflective colors to fit any situation. Colors can also be mixed to create endless combinations. For optimum color effects, a black base coat is recommended before applying your choice of metallic color. Each container is designed to tint a 3 gallon kit to a rich metallic color. If desired, simply add less pigment to achieve a more translucent color.
Cleaning and Preparation Instructions
With 100% solids products, extra care should be taken to ensure proper surface preparation before installation. This means shot-blasting or aggressive diamond grinding. This type of coating is designed to be installed thick and needs maximum adhesion.
1. Interior Floors MUST be profiled prior to application. Shot blast or diamond grind floors with 30 grit or coarser diamonds to achieve a CSP-2 to CSP-3 profile. Dry grinding is highly recommended to avoid introduction of moisture into the concrete.

3. If applying to an existing fully cured and fully adhered coating, the surface must be cleaned and thoroughly sanded with 60 - 100 grit sandpaper.
4. Remove any latent dust from concrete surface by auto scrubber or vacuum system. Do not use any chemicals. Surface must be clean, dry and porous before application of 250 HP Epoxy!
5. Allow area to dry completely.
6. Protect all areas not to be coated. Mask off all adjacent surfaces. Before opening or handling 250 HP Epoxy, first put on proper protective equipment including eye protection, rubber gloves and respirator rated for use with aromatic solvents.
Moisture Testing - Before application of any concrete floor coating, always perform a simple moisture vapor test by taping an 18 inch x 18 inch plastic sheet onto a section of floor. Remove plastic after 24 hours. If floor or plastic is wet, DO NOT PROCEED. First determine if moisture is remaining from the cleaning process, or if it is a more serious issue coming from the soil below the slab. More advanced moisture testing kits should be used on floors with suspected moisture problems. If needed, allow floor additional time to dry from the cleaning process. In winter months or in basements, this could take anywhere from 24 hours to a month or more. If you suspect a moisture issue from beneath the slab, DO NOT PROCEED. Whatever you do, don't take a chance on trapping moisture in the slab. Moisture trapped below the coating will cause the sealer to fail, resulting in a costly disaster for you. When moisture testing confirms the slab is dry, ONLY THEN are you ready to seal the concrete.
Mixing Instructions
Proper mixing is critical to application success.
Mix ratio for Maxx Flow Epoxy is 2(PartA) : 1(PartB)
1. Before mixing, first determine the approximate amount of 250 HP Epoxy you will need to mix to complete the portion of your project you have planned. Do not mix more than you can apply in a 45 minute window. During application, if 250 HP Epoxy begins to harden, the remainder should be discarded and a new batch mixed. Do not add freshly mixed product to container already containing product near the end of it's pot life.

3. Pour appropriate amounts of Part A and Part B into a clean, dry mixing pail. Mix contents thoroughly for 1-2 minutes with low speed drill mixer. Mix gently and avoid whipping air into the coating! Gently pour mixed epoxy into a second clean pail, then gently mix again. This eliminates the possibility of any un-mixed product that may be clinging to the sides of the first mixing pail from being applied to the floor. Improper mixing may result in extreme bubbling or product failure.

5. Product is now ready to apply!
Maximum expected workable pot life after mixing Part A and Part B is approximately 45 minutes at a common temperature range of 70 F - 80 F at 50% relative humidity. Please note that higher temperatures will shorten pot life, as colder temperatures will extend the coatings pot life. Do not apply 250 HP Epoxy if surface temperature is below 50° F. or above 80° F.
Specific Applications
High-solids products like 250 HP Epoxy are actually very easy to apply. Unlike paints and cheap low-solids sealers, these products don't need to be excessively rolled. Apply in a heavy, wet, even coat and let the product self-level. Under application or over-rolling can cause unwanted texture in the final appearance.
Before application, always test product in an inconspicuous area to ensure appearance and compatibility are acceptable. Concrete should be fully cured for 28 days before applying 250 HP Epoxy.


Clear or Solid Color Epoxy Floors:
1. Mix product according to mixing instruction above.


3. Allow floor to cure a minimum of 20 hours for foot traffic and 48 hours for heavier traffic. Product achieves full strength and chemical resistance in 7 days.


Coverage Rate:
One single coat = 75-125 sq. ft. / gallon... This means a 3gallon kit should be enough product to coat approximately 225-375 sq. ft.
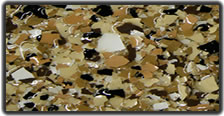
Metallic Epoxy Floors:
Metallic epoxy floors have become extremely popular for garages, restaurants, automotive dealerships and many other high-end commercial spaces. These floors create a deep, rich display of reflective color that appears to flow across the floor. Unlike most concrete coating systems, there are no set rules or instructions on precisely how to apply metallic flooring systems. Colors, patterns and results are completely dependent on the color choices and techniques used during application.
1. Mix product for first (base) coat according to mixing instruction above. Black tint is recommended for optimum color effects, but any color EpoPack can be used to fit your specific needs and desires.
3. Allow base coat to cure for 12-24 hours before proceeding with "metallic" coat. Do not allow first coat to cure longer than 24 hours! If recoating after 24 hours a light sanding using a fine sanding screen will be needed to ensure adequate inner coat adhesion. Please note: Recoat windows are calculated at an average temperature of 70 degrees F. Elevated air or substrate temperatures WILL speed the cure time of the product and shorten the window of opportunity for recoating!
4. Mix product for second (metallic) coat by pouring appropriate amounts of epoxy PartA and PartB into a large mixing pail. Add desired amount of Metallic FX pigment until desired opacity is achieved. Average usage is approximately 2.6 ounces (by weight) of Metallic FX pigment per 1 gallon of finished coating. (each container of Metallic FX tints a 3 gallon kit) This means: To make approximately one gallon of metallic 250 HP Epoxy, mix 1/3 container of Metallic FX pigment with 2/3 gallon of PartA and 1/3 gallon of PartB. Mix contents thoroughly for 1-2 minutes with low speed drill mixer. Mix gently and avoid whipping air into the coating! Gently pour mixed epoxy into a second clean pail, then gently mix again. This eliminates the possibility of any un-mixed product that may be clinging to the sides of the first mixing pail from being applied to the floor. Improper mixing may result in extreme bubbling or product failure.
6. If desired, a final clear coat of 250 HP Epoxy or an even more abrasion resistant Urethane may be applied as a final layer of protection. Do not allow metallic coat to cure longer than 24 hours before applying final coat. If recoating after 24 hours a light sanding using a fine sanding screen will be needed to ensure adequate inner coat adhesion. Please note: Recoat windows are calculated at an average temperature of 72 degrees F. Elevated air or substrate temperatures WILL speed the cure time of the product and shorten the window of opportunity for recoating!
7. Allow floor to cure a minimum of 18 hours for foot traffic and 48 hours for heavier traffic. Product achieves full strength and chemical resistance in 7 days.
Coverage Rates
Base Coat = 100-150 sq. ft. / gallon (may vary depending on porosity of concrete)
Metallic Coat = 40-100 sq. ft. / gallon
Optional Top Coat = 100-125 sq. ft. / gallon
Total Project Estimate Rate = approximately 45 sq. ft. / gallon... This means a 3gallon kit should be approximately enough product to complete 135 sq. ft. of floor. This is based on a two coat application.
Of course, having the right tools will make your job easier, so scroll to the bottom to see our recommended Sprayers, Rollers and Application Tools!
Maintenance

FAQ's
What is the difference between 250 HP and MaxxFlow 250 HP? Why would I choose one over the other?
MaxxFlow has a much longer pot life and offers the installer substantially more working time before the product begins to harden. Both are excellent products, but Maxx Flow is much easier to work with, especially when combined with metallics. The original version of 250 HP works great as an economical base coat for flakes or anytime you prefer a faster curing epoxy.
Got Questions?
Check out the "Help Center", send us an email or just give us a call and we'll be glad to help you with your order!
")
")
")